Showing posts with label favorite. Show all posts

Thursday, October 9, 2008

Homemade Noodles

There are countless recipes for making noodles out there so if you do not like this one I recomend you keep looking and trying different ones. These are very easy and affordable to make and are so delicious you will never use store-bought again!


Basic Homemade Pasta


2 1/2 cups all-purpose flour
2 beaten eggs
1/2 teaspoon salt
1/3 cup water
1 teaspoon oil (cooking or olive)


1. In a large bowl mix dry ingredients. Make a well in the center of the flour mixture. In a seperate bowl mix wet ingredients. Add wet to well in the flour mixture; stir to combine.


2. Turn dough out onto a clean, floured surface. Knead until dough is smooth and elastic (8-10 minutes). Cover and let rest for 10 minutes.


3. Divide dough into 4 equal balls. On a floured surface roll each ball thin. Keep in mind the noodles will plump up while cooking. Let rest again, uncovered, for about 20 minutes.


4. Using a knife or pizza cutter, cut into desired shapes or strips.

5. Drop into hot chicken broth or water. Boil for 2-3 minutes.

Shortcut Pasta

We use this on those nights when we are in a hurry or I have not prepared very well! This recipe makes 2 servings so multiply as needed.


1 cup all-purpose flour
1 pinch salt
1 egg, beaten
1/4 cup water


1. Begin water boiling on your stove. In a large bowl mix dry ingredients and make a well in the center. Add the egg and mix. It will be very dry.


2. Slowly add water until a dough forms. If it gets too wet, slowly add flour back until it is a good, and slightly sticky, dough.


3. On an floured surface, roll out the dough until it is pretty thin. Again, keep in mind these will plump as you cook them. Cut into desired size and shape witha knife or pizza cutter.


4. Carefully drop into boiling water or broth and boil for 2-3 minutes. Drain and enjoy!


We use these noodles in a variety of meals from chicken or beef and gravy to Chicken Noodle Soup. I do not use this in casseroles because I do not have the space to let them dry out. (See below for drying and storing directions.)


For a fun variation add 1/4- 1/2 teaspoon of your favorite herbs to the flour. Basil, thyme, rosemary, sage, marjoram, even cracked pepper - be creative and have fun!


For a heartier flavor and texture use whole wheat pasta.


To store cut pasta, spread on a wire cooling rack or hang from a pasta hanger or a clothes hanger. Let dry overnight or until completely dry. Store in an airtight container and chill for up to 3 days, or in a freezer bag or container in your freezer for up to 8 months.


Watch for my ravioli recipe and other fun ways to use these noodles.

Sunday, September 28, 2008

The Best Banana Bread Ever!

I know it has been way too long since I posted last. It had to be something really good which I finally found. This is the best banana bread I have ever made. Really moist and dense and very tasty!

I cannot take credit for this recipe. I found it on AllRecipes.com which is one of my favorite sites. In my typical fashion, I did make a few adjustments so I have included the recipe as I made it below.

1 cup all-purpose flour (unbleached)
1 cup whole wheat flour
1 teaspoon baking soda
1/4 teaspoon salt
1/2 cup butter
3/4 cup brown sugar, lightly packed
2 eggs, beaten
3 large overripe bananas, mashed but leave some lumps

Optional:
3/4 cup chopped pecans, plus more for topping
Crispy and sweet topping:
1 tablespoon water
3 tablespoon brown sugar, packed

1. Preheat over to 350 degrees. Lightly grease a 9x5 inch loaf pan.
2. In a large bowl, combine flour, baking soda, and salt. In a separate bowl, cream together butter and brown sugar. Stir in eggs and mashed bananas until well blended. Stir banana mixture into the flour mixture and add the nuts if desired; stir until just moistened. (Note: Stirring too much will cause the bread to be dry.) Pour batter into prepared loaf pan. Sprinkle extra nuts on top if desired. (Depending on your oven, you may want to cover the top of the pan loosely with tin foil to prevent the nuts from burning. If so, remove the tin foil for the last 10 minutes or so to allow the top to brown nicely.)
3. Bake in preheated oven for 60-65 minutes, until a toothpick inserted into the center of the loaf comes out clean. Let bread cool in pan for 5 minutes. Now is a good time to mix the water and brown sugar for the crispy topping and brush over the top of the bread. Allow to cool for an additional 5 minutes, or 10 minutes total. Turn out onto a wire rack to continue cooling.

Serve warm or cool. This is even great toasted with a little butter or honey butter for a yummy mid-morning snack!

Monday, July 21, 2008

Fun Pancakes

I love pancakes. Actually I love all breakfast foods. It is my favorite meal and I can eat it at any time of day or night. Mmmmm... Anyway - back to my point.

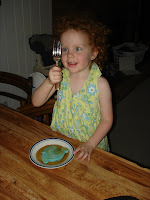
The other evening my kids asked if we could have pancakes for breakfast the next morning. Sure! That morning my darling 5 year old daughter crept into our room, to my husband's side of the bed, and whispered excitedly "Daddy! It's Pancake Day!!!" How can I possibly stay in bed after that!

There are tons of good pancake mixes and recipes out there so I am not going to bore you with mine. Besides it is not the recipe that matters as much as the extras you add to it. For us it is color - food coloring that is!

When my brother and I were little, my mom worked a few evenings each week and my dad made us dinner. One of my fondest memories is when he would make us pancakes for dinner. He would color them, even getting creative and marbeling two different colors together.

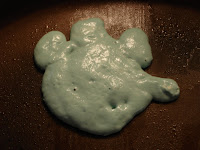
When my 8 year old son was tiny he loved Blue's Clues. It was like an obsession with him. I began making Blue's Clues pancakes for him. To do this mix in several drops of blue food coloring until it is a good blue color (otherwise it looks green). Take a large spoon and pour batter into a 3-4" circle, then quickly add 4 smaller circles as the "toes" to make the paw-print.

My daughters requested Magenta pancakes so I used several drops of red and one or two of blue.

For me I skipped the color but added some whole ground wheat.


So make a fun memory for you and your kids. Have breakfast for dinner and make it original. Have fun!

Cute, huh?

Wednesday, July 2, 2008

Fruit Crisp

Crunchy, sweet and oh-so-yummy!


This is a dish that never leaves any leftovers no matter how much I make! I originally got the recipe from my Better Homes & Gardens recipe book. I made a few small alterations.


Ingredients:

5 cups slices, peeled cooking apples, pears, peaches or apricots, or frozen unsweetened peach slices (I increase the fruit)
2-4 tablespoons granulated sugar (I use 1-2 tablespoons sugar or 1/2-1 tablespoon Splenda)
1/2 cup regular rolled oats
1/2 cup packed brown sugar (unpacked if you prefer it less-sweet)
1/4 cup all-purpose flour (I use whole-wheat flour)
1/4 teaspoon ground nutmeg, ginger or cinnamon (I use both nutmeg and cinnamon)
1/4 cup butter or margarine, room temperature
1/4 cup chopped nuts or coconut
Vanilla ice cream

Directions:

1. For fruit filling, thaw fruit if frozen. Do not drain. Place in a 2-quart square baking dish. Stir in granulated sugar.

2. For topping, in a medium bowl combine the oats, brown sugar, flour, nutmeg (or cinnamon, ginger). Cut in butter until mixture resembles coarse crumbs. Stir in the nuts. Sprinkle the topping over the fruit.

3. Bake in a 375 degree oven for 30-35 minutes (40 minutes for thawed fruit) or until fruit is tender and topping is golden brown. If desired, serve warm with ice cream.

Nutrition Facts (based on original recipe)
6 servings
319 cal., 13 g total fat, 6 g sat. fat, 22 mg chol., 92 mg sodium, 53 g carbs., 5 g fiber, 3 g protein
Daily Values:
7% vit. A, 1% vit. C, 4% calcium, 7% iron


***There are also variations for microwave cooking and for blueberry, cherry and rhubarb crisp. If you want these leave a comment and I will get them too you. ***


A lighter version we love to make during the summer will be coming soon!